
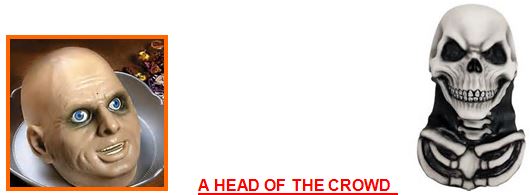
YOU WILL NEED:
Halloween mask
Stuffing material
Platter of candy
Put last years Halloween mask to work! Simply stuff the old mask with newspaper, packing foam, towels or a bundle of plastic bags and place in the center of you candy platter. Tricker-or-treaters will think twice before reaching for the goodies!
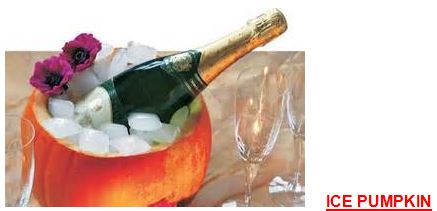
YOU WILL NEED:
Pumpkin
Carving tools
For a fun way to serve you Halloween drinks use a pumpkin! Clean as you would for a traditional carve but leave a little extra flesh. Wipe or rinse out the inside, fill with ice and add you Halloween drink of choice!

YOU WILL NEED:
14 Large black trash bags
Black tape or dark colored pipe cleaners
Thin wire (optional)
Plastic cups or red paper for eyes and mouth
Stuffing material (newspapers, bubble wrap, packing foam, leaves from your yard)
Scissors
BODY-
Stuff 1 black trash bag ¾ full of crumpled newspaper (or any type packing material; foam, bubble wrap, leaves from your yard)
Gather excess bag at the end and tape closed with black tape
Stuff 1 black trash bag ¼ full of crumpled newspaper (or other packing material)
Gather excess bag and tape to close
Attach the two bags tightly together at ends and tape or wire together
LEGS-
Lay 3 bags end-to-end overlapping by about 10 inches
If using wire for bendable legs lay wire on top of bags and cut to the same size.
Roll up tight lengthwise and tape at ends and at the area the bags overlap.
Make additional synch points along the leg to emulate a spider’s leg joints and to keep the bags rolled snug.
Make four long legs.
Cut four small slits along one side of the spider body, low and close to the ground.
Do the same on the other side matching the approximate slit positions.
Thread the legs in one of the slits, weave through the stuffed bags, and pull out the slit on the opposite side.
Bend all the legs UP at the body and bend down to replicate a spider legs.
FACE-
Cut 3 red plastic party cups approximately 3” from the bottom.
Glue or tape 2 close together for eyes and 1 underneath for mouth
Place him in your house or right in the front yard to greet trick-or-treaters!
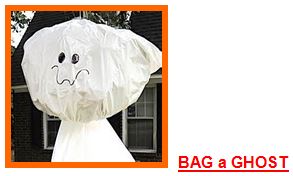
YOU WILL NEED:
2 white trash bags
15 white plastic grocery bags inserted into each other to form a bundle
Black sharpie
Old wire coat hanger
String, thread or tape to gather neck
Scissors
HEAD-
Insert wire coat hanger into bundle of bags
Bend if needed to keep bag bundle round
Push the hook end through the bottom of the bundle and puncture (pulling wire hook out the top)
Tie the exterior bag tight around the hanger
BODY-
Open one white trash bag and feed over the hanger-bag bundle
Gather bag approximately 1/3 of the way down from the top, (be sure not to cinch to tightly) and tape or tie
Lay second white bag flat on table and cut the bottom open
Stretch cut bag up over the gathered part of the first bag
Fold the cut end down to form a clean line, cinch around the upper bag and tie or tape
Hang Bag a Ghost in tree, ledge or awning and watch as he sways in the breeze!

YOU WILL NEED:
Any plastic or rubber toys or dolls
Mat knife
Skill saw
NOTE: If working with hard plastic a skill saw may be required to cut through the toy
Simply cut holes in bellies, remove heads or carve out craniums. Insert a lining of foil or plastic wrap (if toy is large enough) insert entire bowl into head.

YOU WILL NEED:
Pumpkin
Wig or hair extensions
Accessories (hat, scarf, boa)
Sharpie or old make-up
Simply dress up your pumpkin like you use to dress and make-up dolls! Use T-pins to hold wig or hair in place and to give it a boost by placing it on a stand or simply turn a bowl or basket upside down and cover with scrap fabric.

YOU WILL NEED:
1 box of spaghetti or capellini
2-refrigerated pizza or breadstick dough
Red food coloring
RECIPE; Dog loosing guts
DOG-
Lightly grease a cookie sheet
Using 2 tubes or refrigerated pizza (or bread stick) dough open tubes and shape into a dog
Bake 350 approximately 30 minutes or until light golden brown
Allow to cool and cut a whole into the belly of the dog.
SPAGHETTI-
Cook 1 box of spaghetti according to package directions HOWEVER do not add oil to the water.
2 minutes before pasta is done add 8 drops of RED food coloring and 1 drop of BLUE food coloring.
Boil 2 additional minutes and drain well.
(NOTE if spaghetti is not deep red in color add 1 or 2 additional drops of RED food coloring after draining and swirl to mix.)
Spray lightly with cooking spray to keep separated and look shiny.
ASSEMBLE-
Arrange dog on platter with red spaghetti protruding from the belly opening.

YOU WILL NEED:
Martini glasses
Red hard candies or suckers (or for a kick…try Halls cherry throat lozenges!) 7 candies per glass
Plastic wrap or wax paper
Water
Large bowl
PER GLASS
½ cup Hawaiian Punch
1 oz Chambord
1 oz Dark Rum
RIM
Have clean dry glasses ready to dip into mixture.
Test bowl to be certain that when you turn the glasses upside down, they will fit into the very bottom of the dish so you can dip glass into the melted mixture.
Unwrap candy or lozenges and place between wax paper or plastic wrap.
Hit with hammer to crush.
Place pieces in a microwaveable dish.
Add ½ tablespoon water.
Microwave on high for 20 seconds, stir, and continue to microwave until all pieces are melted.
If mixture appears too thick you may need to add an additional drop of water.
Turn glass upside down and dip into the melted sticky concoction.
Turn right-side-up quickly and allow the melted goo to drip down the side of the glass.
If the liquid starts to cool, just reheat and repeat until all glasses are coated.
Rim coating holds well so you can do this a day or two in advance.
Bloody Alexander Cocktail
½ cup Hawaiian Punch
1 oz Chambord
1 oz Dark Rum
Pour all ingredients into shaker filled with ice and strain into blood rimed glasses
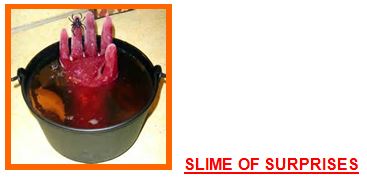
YOU WILL NEED:
Bucket
Enough Jell-O packages to fill your bucket ¾ full (Yellow or green Jell-O looks best)
8-10 mini Halloween toys, (spiders, snakes, bats, fingers, etc)
Rubber glove (or fake hand)
SLIME
Make Jell-O according to package directions and pour into bucket
Refrigerate until almost solidified yet still gooey enough to insert toys
Using a chopstick or ice pick push toys deep into Jell-O
Return to refrigerator and allow it to complete gelling
HAND
Fill a clean, powder-free non-latex glove with water.
Add water until the glove is full but do not over fill.
Drop in 1 or 2 drops of red, blue or yellow food coloring right into the glove to give the hand a creepy effect.
Tie the end of the glove tightly with a rubber band.
Dry off any excess water on outside of glove.
Place the glove on a cookie sheet covered in waxed paper and place it in the freezer overnight.
Cut the latex glove off of the frozen hand and peel the glove off the ice
Place the hand deep into the Jell-O bucket just before placing on Halloween table.
